瓦工推出了一个试验性的新功能,https://pathfabric.com/,为的是如果你买了一个线路比较垃圾(指无中国优化),但性能很强的Vps, 那它就就可以用 WireGuard/GRE/IPIP等方式来把你的垃圾线路转到优化线路上来。
并且几乎无需改动你原有的vps设置。
比如我买了一台Vultr的LAX的VPS, 但在大陆地区,连接并不会特别顺畅,特别是在晚高峰的时候。有了账号后,就可以配置服务了。瓦工做了一键脚本,使用起来很方便。我用GRE做了连接。
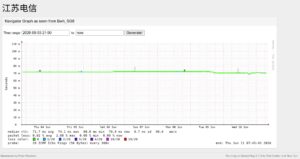
江苏电信直接连接vultr, 可以看得出来,将近30%的丢包率,以下是mtr的数据:
mtr -rzn vu.xxxx.xxx
Start: 2026-07-22T22:07:47+0800
HOST: ImmortalWrt Loss% Snt Last Avg Best Wrst StDev
1. AS??? 100.71.0.1 30.0% 10 10.6 6.8 4.4 11.4 2.9
2. AS??? ??? 100.0 10 0.0 0.0 0.0 0.0 0.0
3. AS??? ??? 100.0 10 0.0 0.0 0.0 0.0 0.0
4. AS??? ??? 100.0 10 0.0 0.0 0.0 0.0 0.0
5. AS??? ??? 100.0 10 0.0 0.0 0.0 0.0 0.0
6. AS4134 202.97.26.101 90.0% 10 10.0 10.0 10.0 10.0 0.0
7. AS??? ??? 100.0 10 0.0 0.0 0.0 0.0 0.0
8. AS??? ??? 100.0 10 0.0 0.0 0.0 0.0 0.0
9. AS4134 202.97.6.2 10.0% 10 156.4 192.2 156.0 477.1 106.8
10. AS4134 218.30.54.182 30.0% 10 183.1 183.1 182.5 183.9 0.4
11. AS1299 62.115.139.16 80.0% 10 164.7 166.4 164.7 168.0 2.4
12. AS1299 62.115.139.150 20.0% 10 180.0 179.9 178.3 181.3 0.9
13. AS1299 62.115.126.251 40.0% 10 163.6 163.3 162.3 164.5 0.9
14. AS1299 62.115.149.37 10.0% 10 153.0 152.1 150.6 153.1 0.7
15. AS??? ??? 100.0 10 0.0 0.0 0.0 0.0 0.0
16. AS??? ??? 100.0 10 0.0 0.0 0.0 0.0 0.0
17. AS20473 107.191.59.147 30.0% 10 171.5 172.5 171.0 174.7 1.2
18. AS20473 149.248.17.213 30.0% 10 182.8 181.9 180.4 182.8 0.9
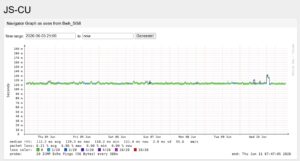
使用加gre 的pathfabric的优化通道后,可以看得出来,对于电信来说,已是CN2 GIA (59.43.xxx.xxx). 线路稳定,无丢包。
mtr -rzn vu-pf.xxx.xxx
Start: 2026-07-22T22:09:46+0800
HOST: ImmortalWrt Loss% Snt Last Avg Best Wrst StDev
1. AS??? 100.71.0.1 0.0% 10 4.5 6.3 3.9 8.5 1.5
2. AS??? ??? 100.0 10 0.0 0.0 0.0 0.0 0.0
3. AS4134 49.84.72.193 90.0% 10 7.0 7.0 7.0 7.0 0.0
4. AS4134 58.217.22.145 80.0% 10 5.2 5.0 4.7 5.2 0.4
5. AS??? ??? 100.0 10 0.0 0.0 0.0 0.0 0.0
6. AS4134 202.97.127.254 40.0% 10 6.8 7.1 5.5 8.8 1.3
7. AS??? 59.43.132.153 0.0% 10 9.8 9.6 8.6 10.6 0.6
8. AS??? 59.43.159.98 70.0% 10 10.4 12.0 10.4 15.0 2.7
9. AS??? 59.43.39.190 80.0% 10 15.3 15.5 15.3 15.7 0.3
10. AS??? 59.43.182.90 10.0% 10 136.1 135.6 134.2 136.3 0.8
11. AS25820 45.78.0.91 20.0% 10 135.7 135.6 133.9 139.4 1.6
12. AS25820 142.0.32.101 30.0% 10 149.0 150.6 149.0 151.6 0.9
13. AS25820 142.0.32.103 30.0% 10 163.1 164.1 163.1 164.6 0.5
14. AS25820 142.0.32.255 10.0% 10 151.9 150.7 149.4 151.9 0.7
15. AS25820 67.230.188.30 0.0% 10 135.2 135.3 133.8 139.9 1.8
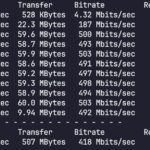
iperf3 的数据,原vultr线路与pf优化后的线咱,受限于路由器的性能,可以看到,单线程已达到路由器的极限。
root@ImmortalWrt:~# iperf3 -Rc vu.xxxx.xxx
Connecting to host vu.xxxx.xxx, port 5201
Reverse mode, remote host vu.xxxx.xxx is sending
[ 5] local 100.71.124.105 port 44432 connected to 149.248.17.213 port 5201
[ ID] Interval Transfer Bitrate
[ 5] 0.00-1.00 sec 113 KBytes 921 Kbits/sec
[ 5] 1.00-2.00 sec 527 KBytes 4.32 Mbits/sec
[ 5] 2.00-3.00 sec 1.55 MBytes 13.0 Mbits/sec
[ 5] 3.00-4.00 sec 2.13 MBytes 17.9 Mbits/sec
[ 5] 4.00-5.00 sec 2.12 MBytes 17.8 Mbits/sec
[ 5] 5.00-6.00 sec 1.33 MBytes 11.2 Mbits/sec
[ 5] 6.00-7.00 sec 1.41 MBytes 11.8 Mbits/sec
[ 5] 7.00-8.00 sec 1.50 MBytes 12.6 Mbits/sec
[ 5] 8.00-9.00 sec 2.08 MBytes 17.5 Mbits/sec
[ 5] 9.00-10.01 sec 1.59 MBytes 13.3 Mbits/sec
– – – – – – – – – – – – – – – – – – – – – – – – –
[ ID] Interval Transfer Bitrate Retr
[ 5] 0.00-10.18 sec 21.6 MBytes 17.8 Mbits/sec 2256 sender
[ 5] 0.00-10.01 sec 14.4 MBytes 12.0 Mbits/sec receiver
iperf Done.
root@ImmortalWrt:~# iperf3 -Rc vu-pf.xxxx.xxx
Connecting to host vu-pf.xxxx.xxx, port 5201
Reverse mode, remote host vu-pf.xxxx.xxx is sending
[ 5] local 100.71.124.105 port 56954 connected to 67.230.188.30 port 5201
[ ID] Interval Transfer Bitrate
[ 5] 0.00-1.00 sec 1.61 MBytes 13.5 Mbits/sec
[ 5] 1.00-2.00 sec 13.4 MBytes 112 Mbits/sec
[ 5] 2.00-3.00 sec 13.6 MBytes 115 Mbits/sec
[ 5] 3.00-4.00 sec 14.0 MBytes 118 Mbits/sec
[ 5] 4.00-5.00 sec 13.7 MBytes 115 Mbits/sec
[ 5] 5.00-6.00 sec 14.0 MBytes 117 Mbits/sec
[ 5] 6.00-7.00 sec 13.4 MBytes 112 Mbits/sec
[ 5] 7.00-8.00 sec 13.8 MBytes 116 Mbits/sec
[ 5] 8.00-9.00 sec 13.8 MBytes 116 Mbits/sec
[ 5] 9.00-10.00 sec 13.8 MBytes 116 Mbits/sec
– – – – – – – – – – – – – – – – – – – – – – – – –
[ ID] Interval Transfer Bitrate Retr
[ 5] 0.00-10.13 sec 147 MBytes 121 Mbits/sec 0 sender
[ 5] 0.00-10.00 sec 125 MBytes 105 Mbits/sec receiver
iperf Done.
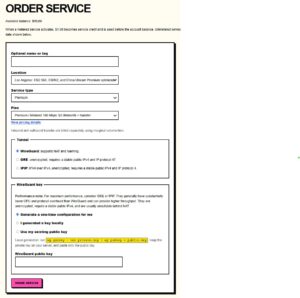
当然购买也非常简单,order service 后,就会出现你要买的服务,当然现在无促销,还是有点小贵的。

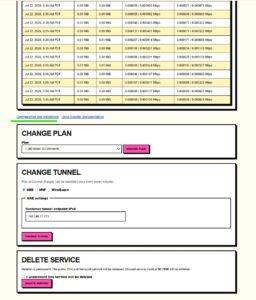
布署到vps中也非常简单,在服务中点开你的服务,然后选中Configuration and installation,即可在Generate one-time installer link中创建一键安装脚本。


之后安装脚本就太简单了. 期待瓦工能来一波大力度促销。
Installer link
This single-use link expires in 24 hours. Choose one download method; the first successful download consumes the link.
Download Linux installer
Download with wget
umask 077
wget -O pathfabric-install.sh 'https://pathfabric.com/install?token=Vixxxx-ssssxxx-xxxx_xx1g'
Download with curl
umask 077
curl -fL -o pathfabric-install.sh 'https://pathfabric.com/install?token=Vixxxx-ssssxxx-xxxx_xx1g'
Inspect and run
chmod 700 pathfabric-install.sh
sudo ./pathfabric-install.sh --install
Example unattended installation:
sudo ./pathfabric-install.sh --install --unattended \
  --default-gateway=tunnel