Debian 8 Server搭建Postfix+Dovecot邮件服务器
技术标签: 邮件服务器 debian dovecot postfix
自己搭建邮件服务器有许多好处,比如可以解决隐私问题。自己的邮件服务器只有自己才能查看里面的邮件,再也不用担心电子邮箱提供商比如Gmail、 QQ邮箱、网易邮箱的员工偷看我们的邮件了,或者把我们的邮件提供给政府机构。另外一个好处是发送附件不用担心附件的大小。Gmail的附件不能超过 25M,QQ邮箱的普通附件不能超过20M。有了自己的邮件服务器,我们可以自己限定附件的大小。
在这篇教程中,我将告诉你如何搭建一个简单的Postfix+Dovecot邮件服务器。Postfix是一个MTA,而Dovecot同时实现了MDA和IMAP/POP3服务器两个功能。这篇教程是写给Debian 8 Jessie 用户的,但对其他基于Debian的Linux发行版也有很大的参考价值。在下文中,用domain.com来表示一个域名,你需要将domain.com替换成你自己的域名。完成了所有步骤后,我们的服务器将会有下面的功能:
- 接收和投递邮件 (Postfix,SMTP协议)
- 从邮件客户端读取邮件服务器上的邮件 (Dovecot,IMAP协议)
- 加密连接 (SSL/TLS协议)
- 用户名和密码验证登录 (PAM)
在开始安装前,我强烈建议读者先阅读电子邮件系统是如何运作的?这篇文章。邮件服务器的搭建比web服务器的搭建要复杂得多,了解电子邮件系统背后的原理对下面进行的复杂配置有很大帮助,对今后管理自己的邮件服务器也有用处。搭建一个完全符合自身要求的Linux邮件服务器是一个艰难的过程,除非你是一个专业的服务器管理员。不过,我将详细解释每一个步骤,只要你了解一些基本的Linux命令,并付出一点时间,成功搭建起来并不是一个问题。
设置DNS MX记录和A记录
首先我们需要在域名注册商网站设置好DNS记录以正确地接收和投递邮件。通常邮件服务器需要设置一个MX记录和一个A记录,形式如下:
@         MX       mail.domain.com
mail      A        12.34.56.78
其中@符号表示主机名为空,相当于domain.com。第一条MX记录指定了domain.com这个域名的邮件服务器主机名。它的意思是:如果收件人邮箱地址@符号后面的域名是domain.com,那么发件人的MTA要将邮件投递到mail.domain.com这个主机。第二条A记录将mail.domain.com解析成IP地址。
例如,我的邮箱地址是xiao@linuxbabe.com,邮箱地址@符号后面的域名是linuxbabe.com。在你给我发邮件时,你的MTA首先查询DNS MX记录,“哦,原来是mail.linuxbabe.com这个主机负责linuxbabe.com的邮件呀”。然后你的MTA将查询mail.linuxbabe.com主机的IP地址,也就是从A记录找到mail.linuxbabe.com主机的IP地址,从而可以投递成功。
MX的全称是 Mail Exchanger, A的全称是 Address, 特指 IP Address。
第二条A记录的IP地址可以与web服务器的IP地址相同,也可以不同。这就是说,我们可以在原有web服务器基础上再搭建一个邮件服务器,也可以在另外一台主机上单独搭建邮件服务器。通常web服务器的DNS记录有两条,形式如下:
@               A          12.34.56.78
www             A          12.34.56.78
第一条A记录表示当我们在浏览器地址栏输入domain.com时,浏览器将连接到12.34.56.78这台主机,第二条A记录表示在浏览器地址栏输入www.domain.com时,浏览器将连接到12.34.56.78
验证DNS记录是否设置正确
在终端中输入下面的命令,寻找domain.com的邮件服务器主机名
dig MX domain.com +short
然后输入下面的命令寻找邮件服务器的IP地址,假设邮件服务器的主机名为mail.domain.com
dig A mail.domain.com +short
如果这条命令显示的IP地址是你服务器的IP地址,那么你的DNS设置就是正确的。对 dig MX domain.com +short命令输出结果的解释:比如我的输出结果如下:0 mail.linuxbabe.com.
你会发现邮件服务器主机名前面有一个数字,数字表示这个主机的优先级。有些网站的邮件服务器可能有两三个,数字越低优先级越高。优先级高的邮件服务器接收邮件,其他邮件服务器不接收邮件。但如果优先级高的邮件服务器不在线了,那么发件人的邮件服务器便会把邮件发给下一个优先级的邮件服务器。
你还会发现邮件服务器的主机名后面多了一个小数点。这是因为 dig命令是从 DNS服务器的 zone文件查询信息,zone文件的格式要求 MX对应的邮件服务器主机名要以小数点结束。你在设置 DNS MX记录时不需要加末尾的小数点,因为你是在域名注册商网站编辑 DNS记录,而不是直接编辑 zone文件。末尾的小数点会在你编辑完 DNS MX记录后在 zone文件里自动添加。你在输入 dig A mail.domain.com +short命令时也不需要添加末尾小数点。
获取一个SSL证书
为了邮件的加密传输,我们需要为邮件服务器安装SSL证书。SSL证书分为两种,CA证书和自签证书。CA(Certificate Authority)是浏览器信任的第三方证书签发机构,比如VeriSign。一般情况下CA证书是要花钱买的。自签证书就是自己给自己发一个SSL证书,不过这种证书不太理想。因为浏览器不会信任自签的证书。不过有一个叫Let’s Encrypt的CA机构可以提供免费版本的证书,具体的申请过程请看这篇文章。获得Let’s Encrypt的免费CA证书后,请继续往下看。
安装Postfix
Postfix是一个安全稳定、容易配置的MTA,常见于Unix-like服务器。事实上它是Mac OS X系统默认的MTA。
登录Debain Server,输入下面的命令安装Postfix:
sudo apt-get install postfix
安装过程中会问你邮件服务器的配置类型,如下图。一般情况下,我们需要选择第二个Internet Site。
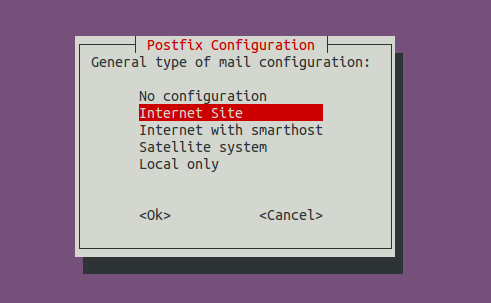
No configuration 表示不要做任何配置;
Internet Site 表示直接使用本地SMTP服务器发送和接收邮件;
Internet with smarthost 表示使用本地SMTP服务器接收邮件,但发送邮件时不直接使用本地SMTP服务器,而是使用第三方smart host来转发邮件;
Satellite system 表示邮件的发送和接收都是由第三方smarthost来完成。
Local only 表示邮件只能在本机用户之间发送和接收。
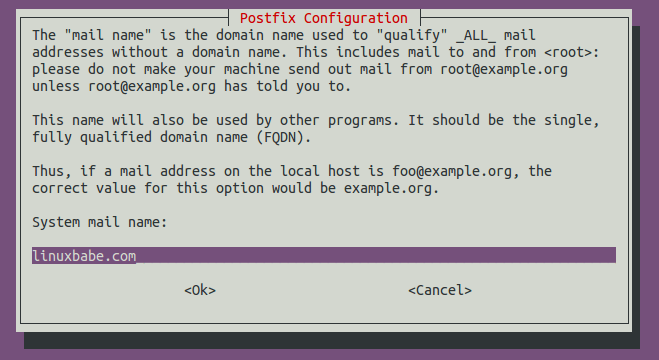
在第二个页面填入你的域名,也就是邮箱地址@符号后面的域名,比如,我的邮箱地址是xiao@linuxbabe.com,所以我填的是linuxbabe.com。
选择OK后,postfix便开始安装,并会根据你的选择和填入的信息生成一个配置文件/etc/postfix/main.cf。
Postfix有一个工具叫做 postconf,你可以输入下面的命令查看 Postfix的版本:
sudo postconf mail_version
Postfix安装好后,就可以收发邮件了。如果你的服务器上有一个用户叫user,那么这个用户的邮箱地址就是user@domain.com。你的服务器上肯定有一个用户叫root,所以root的邮箱地址就是root@domain.com。现在你可以在自己的电脑上给你的服务器用户发送一封测试邮件。发完测试邮件后,在服务器上执行命令mail来查看测试邮件的内容。在mail命令行工具中输入reply来回复这封测试邮件。点击此链接学习如何在命令行界面收发邮件。
配置Postfix
不过,到现在,我们只能在服务器上用命令行来收发邮件,我们最终的目的是要能够在自己的桌面上用邮箱客户端来收发邮件。所以我们还需要做下面的配置。postfix有两个主要的配置文件,一个是/etc/postfix/main.cf,另外一个是/etc/postfix/master.cf。
main.cf myhostname, mydestination, myorigin
首先我们来编辑/etc/postfix/main.cf文件,用你喜欢的文本编辑器打开它:
sudo vi /etc/postfix/main.cf
首先设置文件中第31行myhostname的值。Postfix在接收和发送邮件时,会用myhostname的值向其他SMTP服务器说明自己的身份。myhostname的值要对应域名MX记录的主机名。我的MX记录如下:
@ MX mail.linuxbabe.com
所以我把myhostname的值设置成mail.linuxbabe.com
myhostname = mail.linuxbabe.com
第35行mydestination的值按照下面的设置。Postfix可以负责多个域名的邮件收发业务。我们就是通过mydetination这个参数来指定这些域名。这篇教程只考虑一个域名的邮件收发业务。Postfix在安装过程中,会自动添加localhost.locadomain和localhost到mydestination的值中,这是为了方便本机用户之间的邮件发送。
mydestination = linuxbabe.com, mail.linuxbabe.com, localhost.linuxbabe.com, localhost
然后第34行设置myorigin的值。前面说过,Postfix可以负责多个域名的邮件业务,我们要指定其中一个域名为myorigin。其实在安装postfix的时候我们已经设置好了。myorigin的值就是System mail name的值。它保存在/etc/mailname 文件中。所以myorigin在/etc/postfix/main.cf的值如下:
myorigin = /etc/mailname
你也可以将它直接设置成域名,如
myorigin = linuxbabe.com
master.cf 启用MSA和SMTPS
Postfix自带了一个MSA。当发件人从邮件客户端发送邮件时,MSA接收邮件客户端的邮件,然后提交给Postfix的MTA模块,MTA再发送给收件人的MTA。
邮件客户端和MSA之间使用SMTP协议。当MSA使用SSL/TLS来加密SMTP协议时,会打开465号端口,这时称协议为SMTPS协议。当MSA使用STARTTLS来加密SMTP时,会打开587号端口。输入下面的命令打开/etc/postfix/master.cf文件:
sudo vi /etc/postfix/master.cf
找到以Submission和SMTPS开头的那两行,去掉前面的#符号。-o 表示选项(option),绿色表示要去掉前面的#符号,如果没有这一行,那么要手动添加。如下:
submission inet n - - - - smtpd
  -o syslog_name=postfix/submission
  -o smtpd_tls_security_level=encrypt
  -o smtpd_sasl_auth_enable=yes
# -o smtpd_reject_unlisted_recipient=no
# -o smtpd_client_restrictions=$mua_client_restrictions
# -o smtpd_helo_restrictions=$mua_helo_restrictions
# -o smtpd_sender_restrictions=$mua_sender_restrictions
# -o smtpd_recipient_restrictions=
  -o smtpd_relay_restrictions=permit_sasl_authenticated,reject
# -o milter_macro_daemon_name=ORIGINATING
  -o smtpd_sasl_type=dovecot
  -o smtpd_sasl_path=private/auth
smtps inet n - - - - smtpd
# -o syslog_name=postfix/smtps
# -o smtpd_tls_wrappermode=yes
# -o smtpd_sasl_auth_enable=yes
# -o smtpd_reject_unlisted_recipient=no
# -o smtpd_client_restrictions=$mua_client_restrictions
# -o smtpd_helo_restrictions=$mua_helo_restrictions
# -o smtpd_sender_restrictions=$mua_sender_restrictions
# -o smtpd_recipient_restrictions=
# -o smtpd_relay_restrictions=permit_sasl_authenticated,reject
# -o milter_macro_daemon_name=ORIGINATING
submission这一行启用MSA服务,SMTPS这一行启用SMTPS服务。你也可以只启用MSA,不启用SMTPS。因为MSA默认使用STARTTLS加密,SMTPS快要过时了。
25号端口是MTA打开的端口,当其他MTA发来邮件或本地MSA提交邮件要发送出去时,它们要连接到25号端口。465/587号端口是MSA为MUA打开的端口。
main.cf 安装SSL证书
要加密SMTP协议,我们的邮件服务器必须要有一个SSL证书。从StartSLL取得一个证书后,我们要把证书和私钥安装在邮件服务器上。假设证书文件是unified.crt,保存在/etc/ssl/certs/unified.crt。私钥文件是my-private-decrypted.key,保存在/etc/ssl/certs/my-private-decrypted.key。打开/etc/postfix/main.cf文件,从第21行开始,作如下修改:
# TLS parameters
smtpd_tls_cert_file=/etc/ssl/certs/unified.crt
smtpd_tls_key_file=/etc/ssl/private/my-private-decrypted.key
smtpd_use_tls=yes
smtpd_tls_session_cache_database = btree:${data_directory}/smtpd_scache
smtp_tls_session_cache_database = btree:${data_directory}/smtp_scache
smtpd_tls_security_level=may
smtpd_tls_protocols = !SSLv2, !SSLv3
前面两行指定证书和私钥的在文件系统中的路径,第三行启用TLS加密,第四行和第五行指定缓存文件。第六行的意思是对方邮件服务器或邮件客户端可以选择加密,也可以不加密。最后一行指定不可以使用SSLv2和SSLv3来加密,只允许TLSv1.0以上版本的加密方式。因为这两种加密方式早就过时了,SSLv2在1994年发布,SSLv3在1996年发布。
重新加载Postfix配置文件
配置完Postfix后,输入下面的命令重新加载Postfix配置文件:
sudo /etc/init.d/postfix reload && sudo postfix reload
安装并配置Dovecot
接下来我们要安装并配置Dovecot。Dovecot是一个IMAP/POP3服务器。有了Dovecot,我们才能在自己的邮件客户端读取我们的邮件。
安装Dovecot
输入下面的命令安装Dovecot核心软件包以及IMAP服务器。我们不安装POP3服务器,因为POP3使用不方便。
sudo apt-get install dovecot-core dovecot-imapd
查看Dovecot的版本:
user@debian:~$ sudo dovecot --version
 2.2.13
配置Dovecot
先备份然后编辑/etc/dovecot/dovecot.conf文件:
sudo mv /etc/dovecot/dovecot.conf /etc/dovecot/dovecot.conf.orig
sudo vi /etc/dovecot/dovecot.conf
现在,把下面的内容粘贴到空白的/etc/dovecot/dovecot.conf文件中。
disable_plaintext_auth = no
mail_privileged_group = mail
mail_location = mbox:~/mail:INBOX=/var/mail/%u
userdb {
      driver = passwd
}
passdb {
     args = %s
     driver = pam
}
protocols = " imap"
第一行启用了明文+TLS验证,第二行告诉dovecot以mail系统组的权限访问邮箱,第三行告诉了dovecot邮箱在文件系统中的路径。userdb和passdb让dovecot以Unix验证方式来验证用户。最后一行让dovecot只启用IMAP服务。
下面,让dovocot添加一个垃圾箱和已发送文件夹。在/etc/dovecot/dovecot.conf文件中添加如下内容:
protocol imap {
      mail_plugins = " autocreate"
}
plugin {
      autocreate = Trash
      autocreate2 = Sent
      autosubscribe = Trash
      autosubscribe2 = Sent
}
然后我们需要让dovecot打开一个Unix Socket,以便和Postfix之间进行验证。在文件中添加如下内容:
service auth {
      unix_listener /var/spool/postfix/private/auth {
      group = postfix
      mode = 0660
      user = postfix
    }
}
最后,配置SSL证书和私钥:
ssl=required
ssl_cert = </etc/ssl/certs/unified.crt
ssl_key = </etc/ssl/private/my-private-decrypted.key
保存文件后退出文本编辑器
为root设置一个别名
根据SMTP RFC的规定,所有的邮件服务器上都必须要有postmaster这个邮箱账号。另外一些人期望你的邮件服务器上有hostmaster, abuse, webmaster这些邮箱账号。在/etc/aliasese这个文件中,系统默认设置了很多个别名。postmaster, nobody, hostmaster等这些都是root的别名,所以当别人往这些邮箱账号发邮件时,会被转发到root的邮箱。
mailer-daemon: postmaster
postmaster: root
nobody: root
hostmaster: root
usenet: root
news: root
webmaster: root
www: root
ftp: root
abuse: root
noc: root
security: root
如果你想将root的邮件转发给另外一个用户,比如username , 那么在/etc/aliases末尾添加下面一行:
root: username
将username更改成你的用户名。保存/etc/aliases文件后,我们需要重新生成一个/etc/aliases.db文件,执行下面的命令:
sudo newaliases
root的邮件被转发后,root邮箱不会保留被转发的邮件。
重启Postfix和Dovecot
输入命令
sudo service postfix restart && sudo service dovecot restart
或
sudo systemctl restart postfix && sudo systemctl restart dovocot
在邮件客户端测试我们的邮件服务器
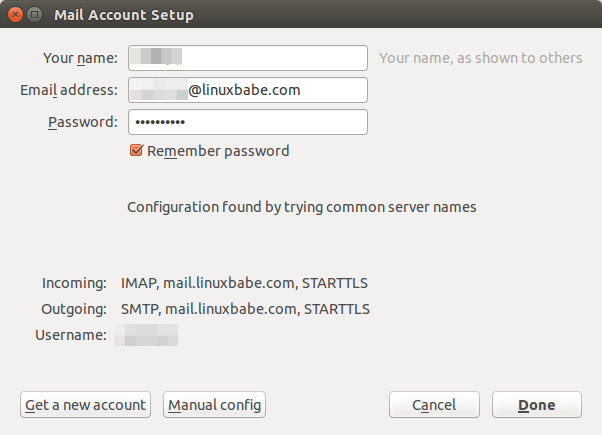
重启之后,我们就可以在桌面电脑使用邮件客户端来测试我们的邮件服务器了。推荐使用thunderbird邮件客户端。邮箱的用户名和密码就是服务器的用户名和密码。如下图,thunderbird自动检测到了linuxbabe.com邮件服务器的IMAP和SMTP服务器配置,并能正确收发邮件。
总结
在这篇教程中,我们首先安装了Postfix。Postfix是一个MTA,也可以叫做SMTP服务器。安装好Postfix后,我们可以登录服务器收发邮件。然后,我们对Postfix做了一些配置,并启用了MSA模块。MSA可以让我们在邮件客户端发送邮件。接下来我们安装了SSL证书。之后我们安装了Dovecot,Dovecot是一个POP3/IMAP服务器。我们的邮箱客户端连接到POP3/IMAP服务器后便可以查看邮件服务器上接收到的邮件。我们还设置了邮箱账号的别名以方便对邮件的接收和管理。